

Revolvers & the Cylinder Gap: Performance Payoff, Safety Risks, and Smart Setup
TL;DR for Skimmers
The cylinder gap—the tiny space between a revolver’s cylinder and barrel—keeps the gun running when hot or dirty, but it vents hot gas and debris sideways, can shave lead if alignment is off, slightly reduces velocity, and is the source of top-strap “flame-cutting.” Keep hands behind the gap (especially on magnums), measure your gap (~0.004–0.008"), and use range rods, feeler gauges, and endshake shims to diagnose and fix alignment/endplay. Some designs (e.g., the Nagant M1895 gas-seal) eliminate the gap entirely, which illustrates the physics at play.
Quick Summary Table
|
Topic |
What It Is |
Why It Matters |
Pros |
Cons / Risks |
What To Do |
|
Cylinder Gap |
The engineered space between the cylinder face and barrel forcing cone (typically ~0.004–0.008"). |
Affects reliability, velocity, “spitting,” and top-strap wear. |
Allows free rotation when fouled/ hot; ensures reliability. |
Gas/particle blast sideways; minor velocity loss; potential lead shaving & flame-cutting. |
Measure the gap, keep hands behind the gap when shooting, maintain timing, fix endshake. |
|
Side Blast |
Hot gas & particulates venting through the gap. |
Can burn or lacerate hands/fingers if improperly gripped. |
None—just physics doing its thing. |
Real injury potential, especially on high-pressure magnums. |
Use revolver-specific grip; keep body clear of the gap; brief new shooters. |
|
Velocity Impact |
Small drop due to venting at the gap. |
Influences chrono results, load selection. |
Predictable, usually small; can be modeled. |
Slightly less velocity than a sealed system; large gaps compound loss. |
Keep gap within spec; pick appropriate loads; understand your chrono data. |
|
Flame-Cutting |
Erosion line on the top strap from hot gas jet. |
Cosmetic vs. structural question comes up often. |
Usually self-limiting; rarely structural. |
Looks alarming; faster with hot/light magnum loads. |
Don’t chase it; manage loads, check timing. |
|
Fixes & Tools |
Endshake shims, range rods, feeler gauges. |
Quantifies & corrects mechanical causes of spitting/drag. |
Professional, repeatable results. |
DIY beyond your skill can worsen issues. |
Use Brownells range rods, Power Custom shims, Starrett gauges; or see a smith. |
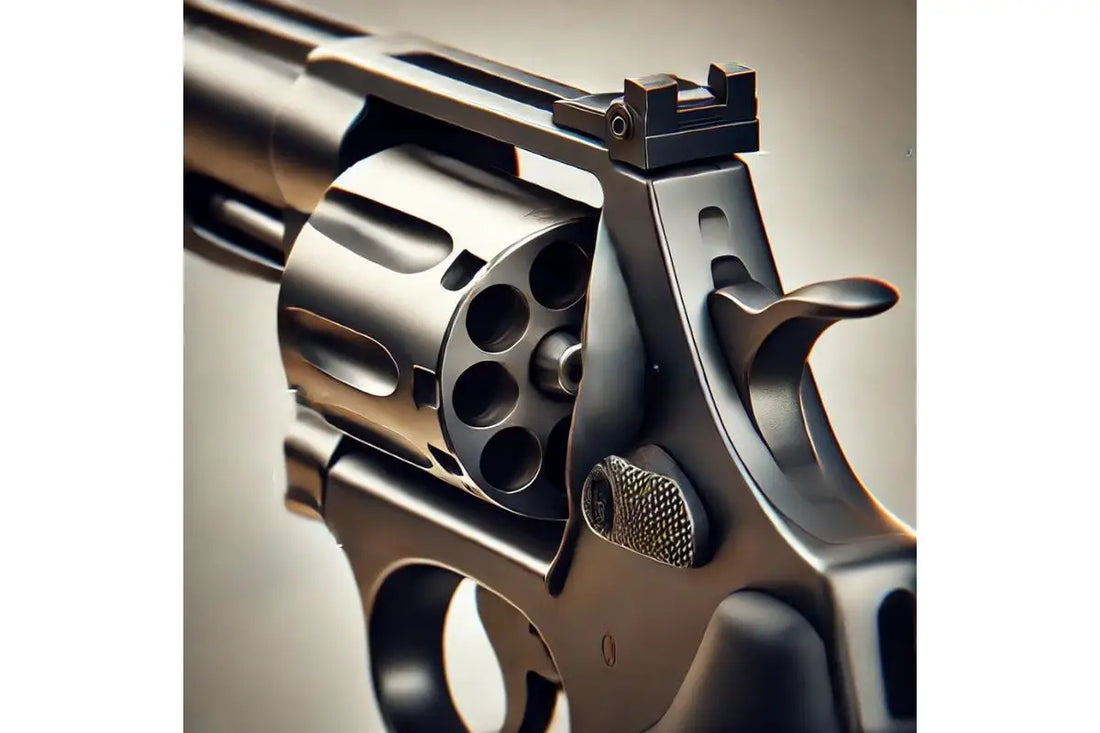
The Cylinder Gap, De-Mystified
What it is. In any traditional double- or single-action revolver, the cylinder must rotate freely. The manufacturer leaves an intentional barrel/cylinder (B/C) gap so the cylinder doesn’t bind as the gun heats or fouls. In serviceable guns, you’ll typically see ~0.004–0.008 inch measured with feeler gauges. Tighter can boost velocity a hair but risks heat/fouling binding; looser tends to increase side-blast and “spitting.”
Why it exists. Revolvers must time, lock, and fire across multiple chambers. Without a gap, thermal expansion and minute tolerance stacking cause drag. The gap is the design’s “safety margin” for reliability that auto-pistols don’t need.
A notable contrast: The Nagant M1895 is the historical proof that sealing the gap increases performance; it cams the cylinder forward to seal against the forcing cone and nets ~50–150 fps more velocity — and is even suppressor-capable. Of course, it trades speed and simplicity of reload and adds mechanical complexity.
What Escapes Through the Gap (and Why You Should Care)
When the cartridge fires, high-pressure gas drives the bullet into the forcing cone. A small portion jets laterally through the gap, carrying hot gas, unburnt powder grains, and occasionally lead/lube particles. That’s the side-blast you sometimes feel as a bystander near a firing line—and the reason you never park your support-hand thumb past the front of the cylinder.
Manufacturers are blunt about this:
- Ruger manual: “All revolvers discharge gas and particles through the clearance gap between the front of the cylinder and rear of the barrel.”
- Smith & Wesson manuals warn: “Always keep your fingers… away from the barrel/cylinder gap during firing. Particles and hot gas will be forced out…”
Practical upshot: the bigger the cartridge pressure (think .357, .44 Magnum, .460 S&W), the more unkind the blast can be. There are real documented injuries when people mirror a semi-auto thumb-forward grip on a revolver. Train your thumbs to stack behind the gap on a wheelgun.
Pro move for instructors: When teaching a new shooter on a GP100, 686, Wrangler, etc., explicitly demonstrate the no-go zone with the muzzle unloaded and cylinder open. Then mark (with a bit of blue tape on the sideplate) the area where their fingers must not stray. It’s simple, sticky muscle memory.
How the Gap Affects Velocity (It’s Less Dramatic Than You Think)
Is a revolver “slow” because of the gap? Not dramatically. The best public dataset, Ballistics by the Inch, tested .38/.357 loads with different gap sizes (.006", .001", and zero sealed) and barrel lengths. The effect is real but modest: tightening/sealing the gap nudges average velocities up, but load-to-load variation and barrel length still dominate the story. Genitron later used BBTI data to build a gap compensation algorithm for velocity modeling. Bottom line: mind the gap, but don’t obsess over a few fps.
Real-world example: If your 4" S&W 686 with a 0.007" gap chronos 50–100 fps lower than a buddy’s tight Ruger GP100 with the same ammo, you’re likely seeing normal variance plus gap effects. That’s not a reliability or safety problem by itself; it’s a data point.
Speculative but reasonable: On very short barrels (2" snubs), the proportionate effect of a loose gap may be slightly more noticeable because dwell time is short and any bleeding matters more; on longer barrels it tends to average out.
The Dangers Everyone Talks About (and a Few They Don’t)
1) Side-Blast Injury
- Mechanism: gas/particles vent sideways at PSI proportional to the cartridge.
- Risk spikes: magnum pressures, improper grip (support-hand fingers creeping forward), shooting from barricades or sticks with hands near the gap.
- Fix: Revolver-specific grip (both thumbs stacked/ tucked), keep all flesh behind the cylinder face, and teach observers to give lateral space.
2) Lead “Spitting” & Forcing Cone Shaving
- Mechanism: minor misalignment/poor timing or rough forcing cone shaves lead as the bullet jumps the gap.
- Symptoms: stinging specks on your forearms, lead specks on bench mates, smeared lead on frame window.
- Fix: Check timing and alignment with a range rod; inspect cone and crown; verify correct bullet diameter and crimp for your throats.
3) Top-Strap “Flame-Cutting”
- Mechanism: a concentrated gas jet erodes a skinny groove in the underside of the top strap.
- Reality check: Most cases are self-limiting—the cut only goes so deep, then stops as the jet loses energy. It looks ugly but is seldom structural on mainstream .357/.44 guns with normal diets. Light, fast magnum loads (e.g., 110–125gr .357 screamers) seem to encourage it.
- Fix: Don’t chase it with files. Change loads, ensure timing is correct, and keep shooting.
4) Binding When Hot/Dirty (Too-Tight Gaps)
- Mechanism: heat and fouling make a tight 0.002–0.003" gap bind; cylinder drags on the forcing cone.
- Fix: Most factory guns avoid this by spec. If you purposely built a tight gun (e.g., some custom PPC revolvers), keep it clean, cool, and lubed; otherwise have a smith reset the gap. (Plenty of anecdotes of revolvers locking up hot, then working fine after cooling.)
Measuring Your Cylinder Gap (and What “Good” Looks Like)
Tools: A quality feeler gauge set (Starrett #66 or 66T), a strong light, and the gun unloaded. For diagnosis beyond the gap, a Brownells Range Rod is the industry standard, and endshake shims are the usual cure for excessive fore-aft cylinder play.
Procedure (high level):
- Unload the revolver twice.
- With the gun at rest (locked), insert feeler blades between the cylinder face and forcing cone at each chamber. Don’t force it; you’re looking for the largest blade that slides without moving the cylinder.
- Repeat with the cylinder pushed back and pulled forward gently to feel for endshake (the difference hints at endplay).
- Record min/max across chambers. Anything hovering ~0.004–0.008" with minimal endshake is normal for service guns. If you see >0.010" with noticeable fore-aft play, that’s a candidate for shims and a smith’s eye.
Interpreting results:
- Tight (~0.003–0.004"): clean-running range/competition tune, but monitor for binding when hot/dirty.
- Middle (~0.005–0.007"): typical duty/carry spec—good reliability in real-world grime.
- Loose (≥0.009–0.012"): expect more side-blast/velocity loss; check for endshake, forcing cone erosion, and timing.
Related jargon to care about:
- Endshake: fore-aft cylinder travel; too much lets the cylinder “kiss” the forcing cone under recoil and opens effective gap intermittently.
- Timing/lockup: whether each chamber lines up and locks fully before the hammer falls; mistiming exacerbates spitting.
Fixing Problems the Right Way (and the Tools We Actually Recommend)
If it’s your first time inside a sideplate, outsource timing and cone work. Endshake shimming and measurement are fair DIY; cutting cones and setting barrels are for pros.
1) Diagnose with a Range Rod
- Brownells Revolver Range Rod kits let you test chamber-to-bore alignment and pinpoint which holes are shaving. If a head won’t pass, you’ve got alignment to correct before you blame ammo.
2) Measure with Precision
- Starrett #66/66T feeler gauges are durable, accurate, and frankly the last set you’ll buy. In the shop, I want measurements I can trust when I’m deciding whether to adjust a barrel set-back.
3) Tame Endshake (and Apparent “Growing” Gaps)
- Power Custom/TK Custom endshake shims (.002") are the industry’s unobtrusive fix for S&W K/L/N, Colt SAA, and many Ruger setups. Installed on the yoke/crane or base pin interface, they reduce fore-aft wobble, stabilize your effective B/C gap, and can calm spitting. Not a cure-all, but often the lowest-risk step.
4) When It’s Gunsmith Time
- Setting back a barrel and recutting the forcing cone (commonly 11° or 18°) are gunsmith operations. If your gap is wildly out of spec, the cone is cracked (some K-frames show forcing cone erosion at the 6 o’clock flat with hot 125s), or timing is off, pay a pro. The cost is usually cheaper than parts you can ruin learning.
Products & Examples (High-Quality, No-Compromise Picks)
- Revolvers referenced:
- Ruger GP100 (.357 Mag) — a robust DA platform with generous real-world tolerances that still shoots tight (think: “reliability first”).
- Smith & Wesson 686 (.357 Mag) — classic L-frame balance; easy chrono benchmarking; plentiful parts.
- Ruger Wrangler (.22 LR) — handy single-action whose manual is very explicit about cylinder-gap hazards (useful for teaching).
- S&W X-Frame (.460/.500 S&W) — textbook demonstration platforms for why you respect the gap on high-pressure rounds.
- Precision tools:
- Brownells Revolver Range Rods — Match heads in your caliber to verify alignment and diagnose spitting.
- Starrett #66 / 66T Feeler Gauges — for repeatable B/C gap and endshake measurements.
- Power Custom / TK Custom Endshake Shims — targeted endplay control for S&W and others.
(Note: We’re intentionally listing best-in-class tools rather than bargain options; poor gauges and mystery shims cause more trouble than they solve.)
Grip, Stance, and Training Notes (Where Injuries Actually Happen)
Even advanced shooters cross-pollinate thumb-forward semi-auto grip habits to revolvers. That puts your support-side thumb dangerously near the cylinder gap. World-class revolver teachers (e.g., Jerry Miculek) emphasize keeping both thumbs behind the gap while still getting robust, high-grip purchase and wrist lock. If you coach shooters, incorporate explicit gap discipline into your dry-fire block and your live-fire safety brief.
Classroom demo that sticks: Hold a piece of cardboard 1–2" off the cylinder face (unloaded gun, obviously) and explain where the blast would go. Then show the Ruger/S&W manual warning—manufacturers put those in for a reason. It’s amazingly effective for new shooters.
The Edge Cases and Contrarian Takes
- Tight-gap mania: Some competition tuners chase ultra-tight gaps to squeeze every fps. It can work—but if you aren’t meticulously maintaining the gun (and you heat it up in a match), expect intermittent drag. For most shooters, 0.005–0.006" is the sweet spot of reliability vs. performance. (SASS black-powder folks often run looser gaps on purpose to stave off fouling bind over long stages.)
- “Flame-cutting ruins guns.” The internet has countless dramatic photos, but most factory revolvers exhibit self-limiting erosion that halts at a few thousandths and never becomes structural. If the cut deepens rapidly, look for timing/ cone issues or scorching light/fast loads.
- “Revolvers don’t malfunction.” They do—just differently. Endshake growth, backed-out ejector rods (on older S&Ws), debris under the extractor star, and mis-timed lockup can all stop play. It’s why inspection and measurement matter.
Pros & Cons of the Cylinder Gap (Yes, It Has Pros)
Pros
- Reliability in the real world: Room for heat and fouling; the gun keeps turning.
- Serviceability: Gap, timing, and endshake are measurable and correctable with known procedures.
- Safety margin: Prevents binding lockups that could occur with a zero-clearance design in dirty conditions.
- Consistency: Once set and maintained, the effect on POI/velocity is predictable.
Cons / Risks
- Side-blast hazard: Real injury potential with improper grip or barricade use (especially on magnums).
- Lead spitting: Misalignment or rough cones throw debris, annoying neighbors and peppering the shooter.
- Velocity/efficiency loss: Measurable but usually modest; large gaps exacerbate it.
- Top-strap wear: Cosmetic flame-cutting that spooks buyers and can affect resale perception even if benign.
Practical Maintenance Checklist (Expert-Level, Minimal Drama)
- Before matches / carry quals
- Verify B/C gap at one chamber with feelers (spot-check only).
- Check endshake by feel; if in doubt, measure.
- Spin the cylinder slowly in lock to feel for a high spot or rub.
- Quarterly (or every ~1,000 rounds)
- Full gap survey (all chambers).
- Range-rod each chamber; note any that won’t pass.
- Inspect forcing cone and throat edges for burrs/erosion.
- Confirm ejector rod is secure (relevant on certain S&W eras).
- When to intervene
- Gap >0.010" with visible endshake: install shims; reassess.
- Persistent spitting from certain chambers: range-rod misalignment and consult a smith for yoke/crane straightening or barrel set.
- Rapid flame-cut progression: load audit (avoid screaming light bullets), verify timing.
What the Experts Say
- Ruger: “All revolvers discharge gas and particles through the clearance gap between the front of the cylinder and rear of the barrel.” Keep hands out of the blast path.
- Smith & Wesson: “Always keep your fingers… away from the barrel/cylinder gap during firing. Particles and hot gas will be forced out…”
- Brownells (Range Rod instructions): Range rods confirm alignment and help locate causes of lead splatter and timing issues—precisely what most people misdiagnose as “bad ammo.”
Bottom Line (and How to Be “That” Revolver Shooter Everyone Trusts)
- Respect the gap. It’s not a flaw; it’s a design choice with tradeoffs.
- Measure, don’t guess. Feeler gauges + range rod beat internet speculation.
- Mind your grip. Revolver thumbs belong behind the gap, always.
- Fix the root causes. If you’re getting spitting or rapid erosion, chase timing/endshake, not magic lubes.
- Choose loads intelligently. Heavy-for-caliber .357s are kinder to cones/top straps than ultra-light screamers—without giving up real-world effectiveness.
Shop precision gauges & revolver tools at Brownells.com.


